Vevor Slush Machine Troubleshooting: Ultimate Guide

There’s nothing quite like the joy of sipping on a perfectly chilled slushie, especially on a hot summer day. Vevor slush machines have become a beloved addition to countless homes and businesses, delivering those delightful frozen beverages that we all crave. However, like any appliance, these machines can occasionally encounter issues that disrupt the slushie flow.

But fear not! Whether you’re a proud owner of a Vevor slush machine or considering getting one, this troubleshooting guide is here to save the day. We understand that a malfunctioning slush machine can be a major buzzkill, and that’s why we’ve created this comprehensive resource to help you diagnose and resolve common issues with your Vevor slush machine.

In this guide, we’ll walk you through everything you need to know, from understanding the basic components of your slush machine to identifying and tackling those pesky problems that can arise. By the time you’ve finished reading, you’ll be well-equipped to keep your slush machine humming along, ensuring that you can continue enjoying those icy treats without a hitch.

So, if you’re ready to take charge of your slush machine’s performance and bid farewell to slushie mishaps, let’s dive in and explore the world of Vevor slush machine troubleshooting. Your frozen adventures are about to get a whole lot smoother!

Understanding Your Vevor Slush Machine

Before delving into troubleshooting, it’s essential to have a solid grasp of your Vevor slush machine’s basic components and how it operates. This understanding will not only aid you in pinpointing potential issues but also empower you to maintain your machine for optimal performance.

Components of a Vevor Slush Machine

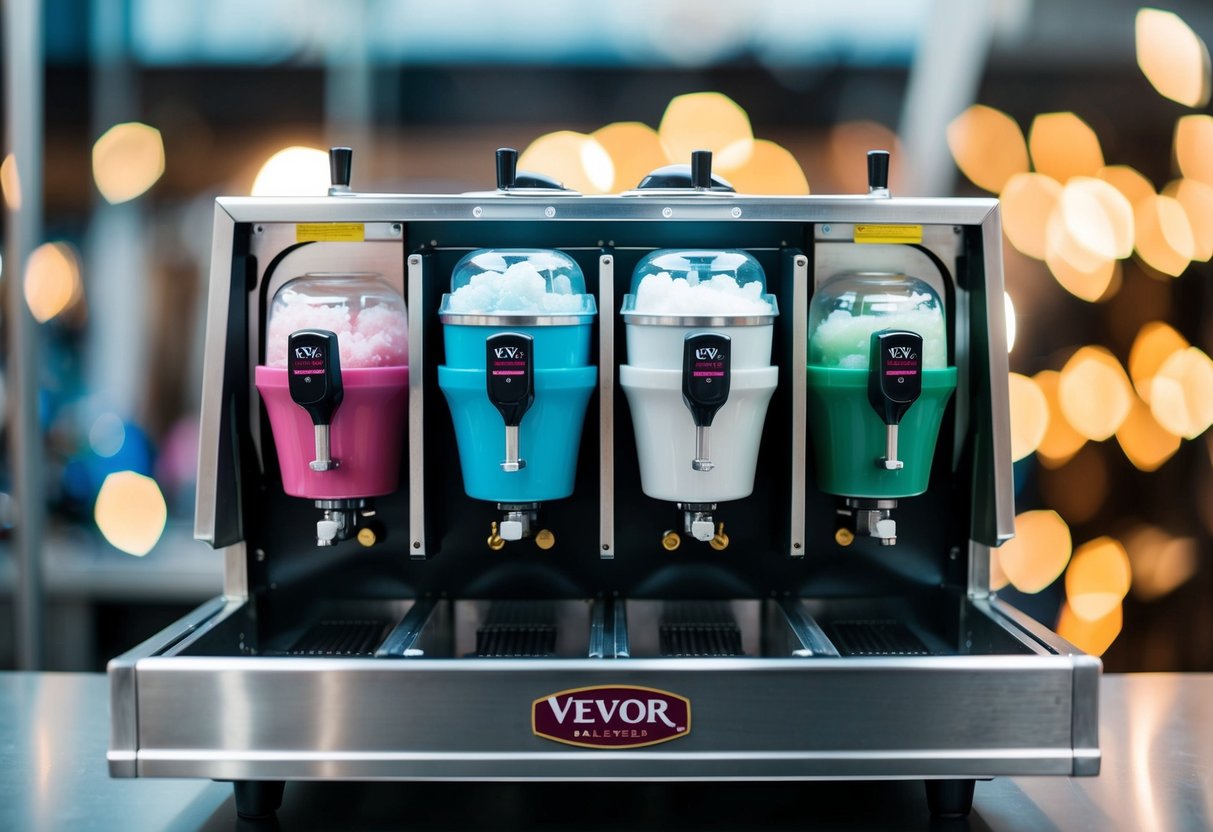
  • Mixing Chamber: This is where the magic happens. It’s the chamber where the slush mixture is stored and frozen into that perfect, icy consistency.
  • Auger or Agitator: The auger is responsible for churning and stirring the slush mixture continuously, preventing it from freezing into a solid block.
  • Refrigeration System: The heart of the machine. It’s in charge of cooling the slush mixture. This system includes a compressor, condenser, and evaporator, working together to maintain the desired temperature.
  • Control Panel: The control panel typically features buttons or dials to set and adjust the machine’s temperature and operation modes.
  • Drip Tray: This collects any excess slush or spills, keeping your countertop clean.

How a Vevor Slush Machine Works

  • When you pour your slushie mixture into the mixing chamber, the refrigeration system gets to work. It lowers the temperature, causing the liquid to freeze gradually.
  • The auger or agitator continuously stirs the mixture, ensuring a uniform slush consistency.
  • The control panel allows you to set the desired temperature, which is crucial for achieving the perfect slushie texture.
  • As the mixture freezes, the slush is dispensed from the machine through a spigot, ready to be served.

Having this knowledge is like having the map to the treasure; it equips you with the fundamental understanding necessary to navigate the troubleshooting process effectively. Now that we’ve uncovered the basics, let’s move on to addressing those common Vevor slush machine problems.

Pre-Troubleshooting Preparations

Before diving into the nitty-gritty of troubleshooting your Vevor Slush Machine, it’s crucial to take some preliminary steps to ensure safety and efficiency. Here’s a quick checklist of pre-troubleshooting preparations:

  1. Safety First: Always prioritize safety. Ensure the machine is unplugged before any troubleshooting begins to avoid electrical accidents.
  2. Gather Tools: Collect the necessary tools and materials, such as a screwdriver, a multimeter for electrical testing, and any replacement parts you may need.
  3. Read the Manual: Consult your Vevor Slush Machine’s user manual. It often contains troubleshooting tips specific to your model.
  4. Clear Workspace: Create a clean and well-lit workspace. This makes it easier to identify and address issues.
  5. Inspect the Power Source: Check that the power outlet is functioning correctly. Plug in another device to verify if needed.

These preparations might seem basic, but they’re the foundation for a successful troubleshooting process. Once you’ve ticked off these items, you’re ready to start diagnosing and solving issues with your Vevor Slush Machine.

Vevor Slush Machine Troubleshooting: Ultimate Guide

Common Vevor Slush Machine Problems

Understanding the typical issues that can arise with your Vevor Slush Machine is the first step in troubleshooting effectively. Here, we’ll outline some common problems that users often encounter:

1. Machine Not Turning On

  • Possible Causes:
    • Power source issues.
    • Faulty switch or control panel.
    • Blown fuse.
  • Symptoms: The machine shows no signs of life when powered on.

2. Slush Not Freezing Properly

  • Possible Causes:
    • Incorrect temperature settings.
    • Problems with the refrigeration system.
    • Blockages in the slush mixture.
  • Symptoms: Slushie mixture remains liquid or does not freeze to the desired consistency.

3. Strange Noises from the Machine

  • Possible Causes:
    • Loose components.
    • Moving parts requiring lubrication.
    • Mechanical issues in the auger or compressor.
  • Symptoms: Unusual or loud noises during machine operation.

4. Leaks or Spills

  • Possible Causes:
    • Loose connections.
    • Damaged gaskets or seals.
    • Overfilling the mixing chamber.
  • Symptoms: Liquid slush mixture leaking from the machine, potentially causing a mess.

These are the primary issues that Vevor Slush Machine owners commonly encounter. Knowing these problems and their potential causes will help you pinpoint and address issues more effectively when they arise. In the following sections, we’ll delve into step-by-step troubleshooting for each of these problems.

Troubleshooting Steps

Now that we’ve identified the common problems with your Vevor Slush Machine, let’s dive into the troubleshooting steps for each issue:

1. Machine Not Turning On

  • Step 1: Check the Power Source
    • Ensure the power outlet is working by plugging in another device.
  • Step 2: Inspect the Switch and Control Panel
    • Look for any visible damage or loose connections. Replace if necessary.
  • Step 3: Test the Fuse
    • Locate the machine’s fuse and test it with a multimeter. Replace a blown fuse with one of the same rating.

2. Slush Not Freezing Properly

  • Step 1: Adjust Temperature Settings
    • Consult your user manual to set the machine to the correct temperature for slush production.
  • Step 2: Check the Refrigeration System
    • Inspect the compressor, condenser, and evaporator for any visible issues. If in doubt, consult a technician.
  • Step 3: Clear Blockages
    • If the slush mixture isn’t flowing smoothly, check for blockages in the mix. Clear any obstructions.

3. Strange Noises from the Machine

  • Step 1: Identify the Source
    • Listen closely to determine where the noise is coming from – the compressor, agitator, or elsewhere.
  • Step 2: Tighten Loose Components
    • If the noise is due to loose parts, use appropriate tools to secure them.
  • Step 3: Lubricate Moving Parts
    • Apply lubricant to moving components like the agitator shaft to reduce friction.
  • Step 4: Consult a Technician
    • If the noise persists or is accompanied by other issues, it’s advisable to call a professional technician.

4. Leaks or Spills

  • Step 1: Locate the Source of the Leak
    • Inspect the machine carefully to identify where the leak is originating.
  • Step 2: Tighten Connections
    • If it’s a loose connection, gently tighten it to stop the leak.
  • Step 3: Replace Gaskets or Seals
    • If the issue persists, damaged gaskets or seals might be the culprit. Replace them as needed.
  • Step 4: Avoid Overfilling
    • Ensure you don’t overfill the mixing chamber, as this can lead to leaks.

Remember, safety should always be a priority during troubleshooting. Ensure the machine is unplugged when inspecting or working on any electrical components. If you’re uncertain about any step or if the problem persists despite troubleshooting, it’s wise to contact a professional technician or Vevor’s customer support for further assistance.

Preventive Maintenance Tips

Preventing issues with your Vevor Slush Machine is often more convenient and cost-effective than troubleshooting and repairing them. Here are some preventive maintenance tips to keep your machine running smoothly:

1. Regular Cleaning:

  • Clean the mixing chamber, auger, and all components regularly to prevent buildup of residue.
  • Use mild, non-abrasive cleaners and warm water to avoid damaging parts.

2. Sanitization:

  • Prior to use, sanitize all components that come into contact with the slush mixture, such as the mixing chamber and spigots.
  • Ensure proper hygiene to avoid bacterial growth.

3. Check Seals and Gaskets:

  • Inspect the seals and gaskets for signs of wear or damage. Replace them if necessary to prevent leaks.

4. Lubricate Moving Parts:

  • Periodically lubricate moving components like the agitator shaft to reduce friction and noise.
  • Use food-safe lubricants designed for such machinery.

5. Monitor Temperature Settings:

  • Regularly check and adjust the temperature settings to maintain the desired slush consistency.
  • Consult your user manual for recommended settings.

6. Avoid Overfilling:

  • Do not overfill the mixing chamber. Follow the recommended capacity guidelines to prevent spills and overworking the machine.

7. Inspect Electrical Connections:

  • Check electrical connections for any signs of wear, fraying, or damage.
  • Ensure the power cord is in good condition.

8. Regularly Replace Filters:

  • If your machine has filters, replace them as recommended by the manufacturer to maintain optimal performance.

9. Keep the Area Clean:

  • Maintain a clean and clutter-free workspace around the machine to prevent dirt and debris from entering sensitive components.

10. Follow Manufacturer Recommendations: – Always refer to your Vevor Slush Machine’s user manual for specific maintenance guidelines and recommended schedules.

Related: Fix Vevor Slush Machine Not Freezing: Step-by-Step Guide

When to Seek Professional Help

While DIY troubleshooting can often resolve common issues with your Vevor Slush Machine, there are times when it’s crucial to call in a professional technician:

  1. Electrical Problems: If you suspect any electrical issues, such as damaged wiring or a malfunctioning compressor, it’s safer to have a certified technician address them to avoid electrical hazards.
  2. Persistent Issues: If your troubleshooting efforts don’t resolve the problem, or if the issue keeps recurring, it’s a sign that a deeper problem might exist that requires professional diagnosis.
  3. Warranty Concerns: If your machine is under warranty, attempting repairs on your own may void the warranty. Always check your warranty terms and consider professional service if applicable.
  4. Complex Repairs: For complex components like the refrigeration system, it’s best to leave repairs to experienced technicians who have the necessary tools and expertise.
  5. Safety First: If you’re unsure about any aspect of troubleshooting or repair, prioritize safety. Calling a professional ensures your safety and the longevity of your slush machine.

In these situations, reaching out to Vevor’s customer support or a certified service provider is the wise choice. They can provide expert assistance, ensuring your slush machine is back in operation safely and efficiently.

Conclusion

In the world of frozen delights, your Vevor Slush Machine is a trusty companion. It churns out those refreshing slushies, keeping you cool on scorching days. However, like any machine, it can encounter hiccups. The good news is that armed with the knowledge gained from this troubleshooting guide, you’re well-prepared to tackle common issues head-on.

Remember, a little preventive care goes a long way. Regular cleaning, proper maintenance, and monitoring can keep your machine humming with efficiency. When problems do arise, follow our troubleshooting steps diligently, but always prioritize safety.

If you ever find yourself stumped or dealing with complex issues, don’t hesitate to seek professional assistance. Your Vevor Slush Machine is an investment in frozen joy, and with the right care, it will continue delivering those icy treats for a long time to come.

So, here’s to many more slush-filled adventures, hassle-free and as delightful as ever!